参考画像やアセット集のサムネイル画像、解説画像
などなど、3DCG制作の現場では作業画面のスクリーンショットを必要とされる場面は意外と多い。
「途中経過が見たい」
「イメージ出来るモデルが欲しい」
「2Dイラストのアタリにしたいから作って」
etc
突然こんなオーダーを受けた場合、勿論、レンダリングしても良いのですが、目的を考えたらわざわざそこまでする必要は無いしそもそも面倒。手っ取り早くOSのスクリーンショット機能で済ましちゃう事がほとんど。
ただ、OSのスクリーンショットだと、画像のサイズが安定しないとか、連続撮影は難しいとか、それはそれで問題もあるので、スクリプトでビューポートをキャプチャ出来るならそれに越した事はありません。
MAYAではビューポートのスクリーンショットを撮る方法としては、MAYA API を利用した方法もありますが、Pythonスクリプトだけでも同様の事は可能です。
そこで本記事では、PythonスクリプトでMAYA のビューポートをスクリーンショットする方法を紹介します
 |
|
Mayaのビューポートをスクリーンショットする際に使用するコマンド
ビューポートのスクリーンショットを撮る方法として、Python/MELコマンドを使う方法の他に、MAYA APIを使う方法もあります。
Python/MELコマンドに関しては [modelEditor] [refresh] の2つが、パネルの画像を保存(スクリーンショット)できる機能を有していますが、本記事では取り扱いが簡単で、シェーディングやライティングのモードなどビューポートの表示設定も可能な、Python/MELコマンド [modelEditor] の使い方を紹介します。
modelEditorの基本
[modelEditor] は、ビューポートのシェーディングモードの設定やライティングの設定、レンダラーの設定、表示の有無 など、ビューポートの表示に関するあらゆる操作が可能なコマンドです。
■modelEditorのフラグ
modelEditor( [editorName] , [activeComponentsXray=boolean], [activeCustomEnvironment=string], [activeCustomGeometry=string], [activeCustomLighSet=string], [activeCustomOverrideGeometry=string], [activeCustomRenderer=string], [activeOnly=boolean], [activeShadingGraph=string], [activeView=boolean], [addObjects=string], [addSelected=boolean], [addSelectedObjects=boolean], [allObjects=boolean], [backfaceCulling=boolean], [bufferMode=string], [bumpResolution=[uint, uint]], [camera=string], [cameraName=string], [cameraSet=string], [cameraSetup=boolean], [cameras=boolean], [capture=string], [captureSequenceNumber=int], [clipGhosts=boolean], [cmEnabled=boolean], [colorMap=boolean], [colorResolution=[uint, uint]], [control=boolean], [controlVertices=boolean], [cullingOverride=string], [default=boolean], [defineTemplate=string], [deformers=boolean], [dimensions=boolean], [displayAppearance=string], [displayLights=string], [displayTextures=boolean], [docTag=string], [dynamicConstraints=boolean], [dynamics=boolean], [editorChanged=script], [exists=boolean], [exposure=float], [filter=string], [filteredObjectList=boolean], [fluids=boolean], [fogColor=[float, float, float, float]], [fogDensity=float], [fogEnd=float], [fogMode=string], [fogSource=string], [fogStart=float], [fogging=boolean], [follicles=boolean], [forceMainConnection=string], [gamma=float], [greasePencils=boolean], [grid=boolean], [hairSystems=boolean], [handles=boolean], [headsUpDisplay=boolean], [height=boolean], [highlightConnection=string], [hulls=boolean], [ignorePanZoom=boolean], [ikHandles=boolean], [imagePlane=boolean], [interactive=boolean], [interactiveBackFaceCull=boolean], [interactiveDisableShadows=boolean], [isFiltered=boolean], [jointXray=boolean], [joints=boolean], [lights=boolean], [lineWidth=float], [locators=boolean], [lockMainConnection=boolean], [lowQualityLighting=boolean], [mainListConnection=string], [manipulators=boolean], [maxConstantTransparency=float], [maximumNumHardwareLights=boolean], [modelPanel=string], [motionTrails=boolean], [nCloths=boolean], [nParticles=boolean], [nRigids=boolean], [noUndo=boolean], [nurbsCurves=boolean], [nurbsSurfaces=boolean], [objectFilter=script], [objectFilterList=script], [objectFilterListUI=script], [objectFilterShowInHUD=boolean], [objectFilterUI=script], [occlusionCulling=boolean], [panel=string], [parent=string], [particleInstancers=boolean], [pivots=boolean], [planes=boolean], [pluginObjects=[string, boolean]], [pluginShapes=boolean], [polymeshes=boolean], [queryPluginObjects=string], [removeSelected=boolean], [rendererDeviceName=boolean], [rendererList=boolean], [rendererListUI=boolean], [rendererName=string], [rendererOverrideList=boolean], [rendererOverrideListUI=boolean], [rendererOverrideName=string], [resetCustomCamera=boolean], [sceneRenderFilter=string], [selectionConnection=string], [selectionHiliteDisplay=boolean], [setSelected=boolean], [shadingModel=int], [shadows=boolean], [smallObjectCulling=boolean], [smallObjectThreshold=float], [smoothWireframe=boolean], [sortTransparent=boolean], [stateString=boolean], [stereoDrawMode=boolean], [strokes=boolean], [subdivSurfaces=boolean], [textureAnisotropic=boolean], [textureCompression=boolean], [textureDisplay=string], [textureEnvironmentMap=boolean], [textureHilight=boolean], [textureMaxSize=int], [textureMemoryUsed=boolean], [textureSampling=int], [textures=boolean], [toggleExposure=boolean], [toggleGamma=boolean], [transpInShadows=boolean], [transparencyAlgorithm=string], [twoSidedLighting=boolean], [unParent=boolean], [unlockMainConnection=boolean], [updateColorMode=boolean], [updateMainConnection=boolean], [useBaseRenderer=boolean], [useColorIndex=boolean], [useDefaultMaterial=boolean], [useInteractiveMode=boolean], [useRGBImagePlane=boolean], [useReducedRenderer=boolean], [useTemplate=string], [userNode=string], [viewObjects=boolean], [viewSelected=boolean], [viewTransformName=string], [viewType=boolean], [width=boolean], [wireframeBackingStore=boolean], [wireframeOnShaded=boolean], [xray=boolean])
試しにモデルの表示設定を変更してみたいと思います。
表示の設定を変更するフラグは [displayAppearance]
このフラグに有効な値は「wireframe」、「points」、「boundingBox」、「smoothShaded」、「flatShaded」の5つです。
モデルを生成し、「smoothShaded」で表示します。

フラグ [displayAppearance]に「wireframe」。
スクリプトを実行すると、パースペクティブ・ビューに表示されているモデルが、「wireframe」に変わりました。
from maya import cmds

cmds.modelEditor('modelPanel4', edit=True, displayAppearance='wireframe')
Mayaのビューポートをスクリーンショット
今度は、[modelEditor] で、ビューポートのスクリーンショットを撮りたいと思います。
modelEditorでビューポートをスクリーンショット
[modelEditor] で、スクリーンショットを撮る場合は
・どのビューポート(パネル)を撮るのか
・スクリーンショット画像を保存する場所
を、指定しなければなりません。
スクリーンショット画像の保存先は、フラグ[capture(cpt)]に、パスを指定。
その際、ファイル名に付けた拡張子を自動で識別。適切なファイルフォーマットで保存してくれます。
from maya import cmds
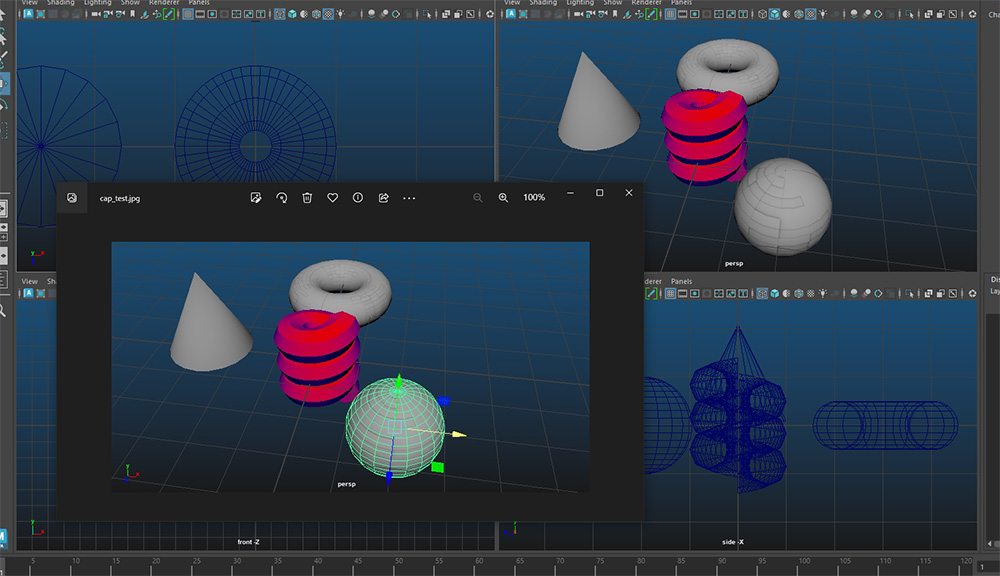
cap_image_path = "c:/.../.../cap_test.jpg"
cmds.modelEditor(panel_name, edit= True, capture= cap_image_path)▲ファイルフォーマット『.jpg』で保存
ここでは、選択したビューポートのパネルを、スクリーンショットの対象にしようと思いますが、その為には、アクティブ状態のパネルの名前を取得しなければなりません。
アクティブ状態のパネル名は getPanel() で取得できます。
現在フォーカスされてるパネル名を返すフラグ withFocus(wf) を指定。これでアクティブ状態のパネル名が取得できます。
cap_panel_name = cmds.getPanel(wf=True)
取得したパネル名を、[modelEditor]の第一引数に指定。
このコードをスクリプトエディター内で実行すると、スクリーンショット対象のパネルがスクリプトエディターになってしまうので、Windowを作成しコマンドが実行されるボタンを設置する、もしくは、シェルフに保存してから実行してください。
from maya import cmds

cap_image_path = "c:/.../.../cap_test.jpg"
cap_panel_name = cmds.getPanel(wf=True)

cmds.modelEditor(cap_panel_name, edit= True, capture= cap_image_path)
選択したパースペクティブ・ビューのスクリーンショットが撮られ、指定のファイルフォーマット『.jpg』で保存されました。

続けて、サイド・ビューのパネルを選択し、スクリーンショットを実行すると、サイド・ビューのスクリーンショットが保存されました。

任意のビューポートをスクリーンショット
スクリーンショットを撮る度に、対象のビューポートパネルを選択するのは面倒にも思えます。
スクリーンショットを撮るビューポートが決まっているなら、そのビューポート・パネルに固定したい。
結果、毎度パネルを選択する必要も無くなる。
MAYAのパネルにはそれぞれデフォルトのパネル名が付けられています。
そのデフォルトのパネル名を [modelEditor] の第一引数に指定すれば、スクリーンショットを撮るビューポートを固定できます。
ビューポートのパネル名は
top (トップ ビュー):modelPanel1
side (サイド ビュー):modelPanel2
front (フロント ビュー):modelPanel3
perspective (パースペクティブ ビュー):modelPanel4
パースペクティブ ビューのパネル名を [modelEditor] の第一引数に指定しました。これで、スクリーンショットの度にパネルを選択する必要がなくなりました
import maya.cmds as cmds

cap_image_path = "c:/.../.../cap_test.jpg" #ファイルフォーマット『.jpg』で保存

cmds.modelEditor("modelPanel4", edit=True, capture=cap_image_path)
トップ・ビューを選択した状態で、スクリプトを実行しても、perspective (パースペクティブ ビュー)のスクリーンショットが撮られました。

シェーディングモードを変更してスクリーンショット
[modelEditor] なら、モデルの表示設定を変更してスクリーンショットを撮るのも簡単。
スクリーンショットを実行する前に、表示設定のコマンドを実行するだけです。
例えば、「smoothShaded」にテクスチャを表示してスクリーンショットを撮る場合このようなコードになります。
import maya.cmds as cmds

cap_image_path = "c:/.../.../cap_test.jpg" #ファイルフォーマット『.jpg』で保存
cap_panel_name = cmds.getPanel(wf=True)

cmds.modelEditor(cap_panel_name, edit=True, displayAppearance='smoothShaded')
cmds.modelEditor(cap_panel_name, edit=True, displayTextures=True)
cmds.modelEditor(cap_panel_name, edit=True, capture=cap_image_path)
表示設定「wireframe」の状態で、スクリーンショットのスクリプトを実行

表示設定が「smoothShaded」、そしてテクスチャが表示された状態でスクリーンショットが撮られました。
これなら、制作中の表示設定がバラバラだったとしても、統一した見た目のスクリーンショットを撮る事ができます。

![[MAYA2022]新機能メッシュをスイープ|SweepMeshならロープの作成も簡単](https://i0.wp.com/liquidjumper.com/Home/wp-content/uploads/2021/04/maya2021_rope_sweepmesh_29.jpg?fit=100%2C56&ssl=1) |
|
『.png』は透過する
[modelEditor] は、取り扱いも簡単で、表示の設定もできるので非常にオススメできる方法なのですが、注意が必要な点があります。
スクリーンショットを保存する際の保存先を指定する際に、ファイルネイムに拡張子を付けると、その拡張子から自動でファイルフォーマット判断、適切なファイルフォーマットで保存してくれますが、問題は『.png』で保存すると、背景箇所が透過してしまう事。

ファイルフォーマットに拘らないなら、『.png』以外のフォーマット、例えば『.jpg』にすれば何も問題は無いのですが、どうしても『.png』で保存したい、と言うことであれば、MAYA API を使うなど他の方法を探す必要があります。
 |
|
まとめ
MAYAのビューポートをPythonスクリプトでスクリーンショットし保存する方法を紹介しました。
スクリーンショットの方法は、 [modelEditor] [refresh] のPython/MELコマンドを使う方法と、MAYA API を使う方法がありますが、 [modelEditor] を使う方法が最も簡単だと思います。更にシェーディングやライティングのモードなどビューポートの表示設定が変更のもオススメできる点です。
import maya.cmds as cmds

cap_image_path = "c:/.../.../cap_test.jpg" #ファイルフォーマット『.jpg』で保存
panel_name = cmds.getPanel(wf=True)

cmds.modelEditor(panel_name, edit=True, displayAppearance='smoothShaded')
cmds.modelEditor(panel_name, edit=True, displayTextures=True)
cmds.modelEditor(panel_name, edit=True, capture=cap_image_path)
ビューポートのスクリーンショットが必要な機会は以外に多く、近年では共有アセットのサムネイル画像として必須になっているところも有るのではないでしょうか。
OSのスクリーンショットで、ちゃちゃっと撮ってしまうのも一つの手ですが、枚数が多いとそうも言ってられない状況に。
でも、スクリプトを使えば枚数が多くても短時間で処理でき、更に表示の設定も統一できるなど、恩恵は大きいと思います。
本記事では、[modelEditor]を使う方法を紹介しましたが、他の方法も含め試してみてください。
 |
|
![]()
自宅からでもWeb制作・プログラミング・アプリ開発などが習得できるさまざまなコースをラインナップ。
非エンジニアでスキルを磨きたい方から、フリーランス、就職/転職を目指す方まで、専属のメンターがサポート。
最近は副業ブームもあり「 はじめての副業コース
 |
|
 |
|
 |
|
 |
|
 |
|
 |
|
 |
|
 |
|